User Guide


  • 1.About Red Panic Button
  • What is Red Panic Button all about?
    admin04-07-2017

    Offering accurate information to those who can help you, the Red Panic Button is basically a user centered Early Warning & Vulnerability Alert System (EWVAS), a one-tomany mode of communication, a uniquely developed mobile phone application that provides users with rapid connection to police, relatives and/or close persons and friends, or the emergency services relevant to their predicament.

    The application enables users to push a central button and generate a security alert, activating immediate contact with various emergency services, providing instant details of location, as well as dialing emergency numbers and sending panic messages via a wide range of communication mediums and channels such as: SMS, Emails and social networks like Twitter.

  • How does the Red Panic Button application work?
    admin04-07-2017

    The application enables users to push a central button and activate immediate
    contact with various emergency services, providing instant details of location as well as the
    following features:

    1. SMS Panic Message: sending the user’s current position and address (in the form of a
      Google Maps link), to all the phone numbers found in the panic contact list;
    2. Email Panic: sending more information (i.e. the local time when the position was taken
      from the GPS); mail message and subject customization;
    3. Twitter Panic: posting a panic tweet to the user’s wall, including the current address
      and a Google Maps link;
    4. Address in panic message: adding the address to your panic messages along with the
      location link;
    5. Emergency dial: the phone dials the emergency number, while at the same time
      sending the panic messages via SMS, Email and Twitter, depending on your application
      configuration;
    6. Audio Panic email: automatically recording and sending a 10 seconds audio file
      attached to the panic email message;
    7. Photo Panic email: automatically take a picture, using front or rear camera, and send it
      attached to the panic email message;
    8. Video Panic email: automatically record a video, using front or rear camera, and send it
      attached to the panic email message;
    9. Quick SMS: containing a customizable panic message;
    10. Remote access: Any user that receives a Panic SMS message can get the latest
      location of the device that sent the message (Android devices only);
    11. Unlimited number of contacts;
    12. International prefix;
    13. Multiple widgets available: Widgets are available on both Android and iOS (through
      the Today View);
    14. Dynamic ambient contrast: using the phone ambient light sensor to enhance
      application readability (Android devices only);
    15. Talk Back compatibility: especially useful for disabled users, i.e. the blind and
      visually impaired, enabling an accessibility service that speaks as you move around the
      screen;
    16. D pad navigation: the application can be easily run without a touchscreen just by
      using the built in directional pad.
  • Areas of action
    admin04-07-2017

    Many Android users have disabilities that require them to interact with their Android devices in different ways. These include users who have visual, physical or age-related disabilities that prevent them from fully using or seeing a touchscreen.

    Android provides an accessibility layer that helps these users navigate their Androidpowered devices more easily. Red Panic Button for Android uses the following accessibility services: text- to-speech, haptic feedback, and trackball/d-pad navigation that augment the user experience.

  • Types of users
    admin04-07-2017

    The Red Panic Button application is designed to improve the life of all citizens, especially those with disabilities and the elderly by offering them a higher degree of security in our society.

    As a mobile device, the application offers users safety guidance in unknown environments (using a GPS option) and helps people feel confident and safe when moving.
     

    These are the main types of users that can benefit from the application:
     

    m.PERSONAL (Personal security)

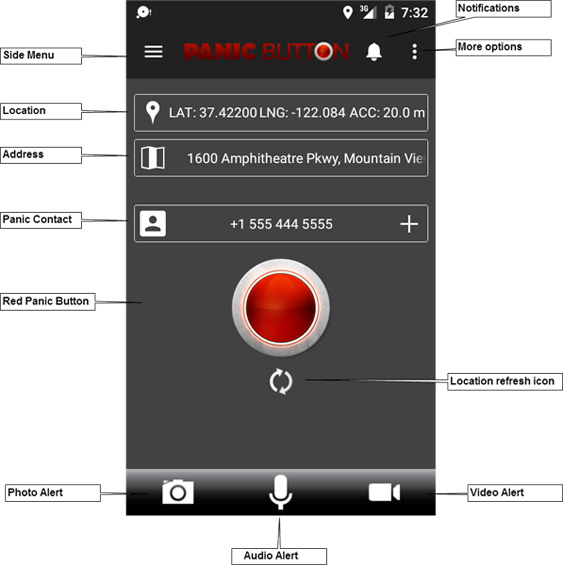
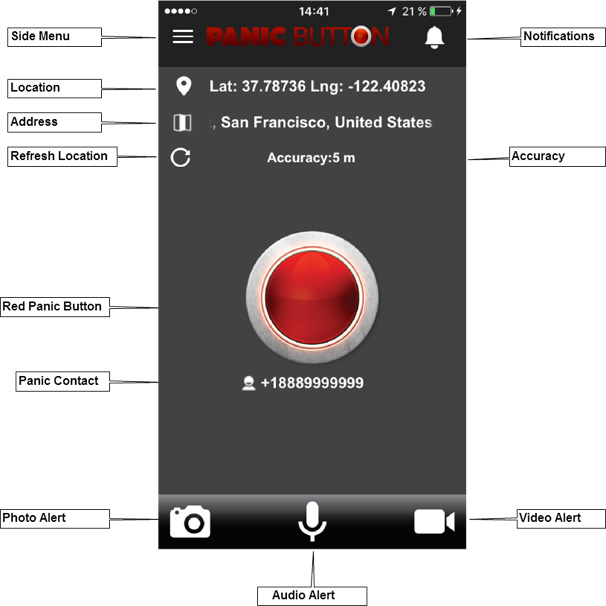
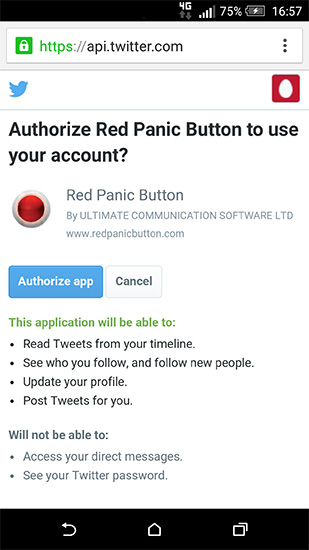
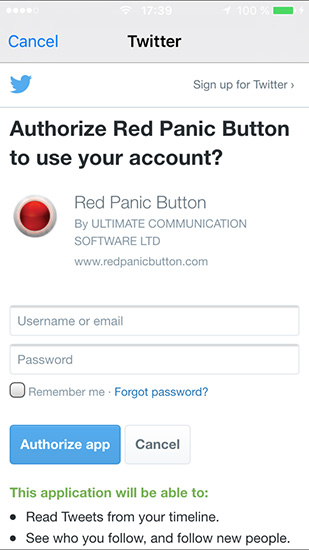
    Provides victims of domestic or urban violence with rapid connection to police. The application enables the user to push a central button and activate immediate contact with the emergency services, providing instant details of location.
     

    m.FAMILY (Family security)

    Special applicability for parents, children and parental organizations.
     

    m.SECURITY (Professional security)

    For police and security agents involved in conflict & emergencies prevention.
     

    m.ELDERLY (Elderly Monitoring & Safety)

    For the elderly users the application heavily impacts on their psychology, but also their everyday lives, as it counteracts the feeling they have that, faced with the dangers of urban and domestic violence, they have lost their freedom and independence.
     

    m.MEDICAL (Medical Emergencies)

    For medical emergencies & people with disabilities, in cases in which: 1. emergency services are frequently inaccessible to people with sensory disabilities; and 2. assistive technologies, which are used by disabled people to access ICT products and services, are often not interoperable with software used in these products and services.
     

    m.TRANSPORT (Transport security)

    An innovative and pioneering project that aims to contribute to the safety of taxi drivers and truckers by preventing or discouraging possible assaults and facilitating a faster and more efficient police response.

    The Safe Transport System is based on the integration of GSM, GPS, Internet and digital cartography technologies, enabling the police to determine the location of the vehicle in real time as soon as the driver gives the alarm, either when stationary or on the move.


    User friendly, accessible and providing citizens of all ages with real-time information and autonomy, Red Panic Button can really make a difference to people’s lives!

  • 2.Availability
  • Availability
    admin04-07-2017

    Offering the application on more platforms is the ideal goal for availability. The iOS iPhone/iPod Touch and iPad version of Red Panic Button is also available on the iTunes Store. Being an iOS Universal application ensures that users pay once and get the desired functionality tailored for all their devices.

    All in all the Android platform offered us the free tools, a development environment and a distribution market that makes it easier for developers to have the applications reach users all around the globe.


    Versions


    Platform Price Name Features
    Android Free Red Panic Button With In-App Purchases
    iOS Free Red Panic Button With In-App Purchases


    Language Support


    Language Android iOS
    English X X
    French X X
    Spanish X X
    Chinese X -
    German X X
    Portuguese X X
    Taiwanese X -


    Supported devices

    Red Panic Button supports all Android and iOS devices running the following minimum version of their operating system.


    OS Version
    Android 4.0 and up
    iOS 9.0 and up


    Feature Availability (free/paid) by platform


    Feature Android

    Free

    Android

    Paid

    iOS

    Free

    iOS

    Paid

    SMS X X X X
    Email X X X X
    Twitter X X X X
    Address in message - X - X
    Emergency dial - X - X
    Audio Panic email - X - X
    Photo Panic email - X - X
    Video Panic email - X - X
    Quick SMS X X X X
    Remote Access - X - -
    Multiple contacts - X - X
    Widgets X X X X
    International prefix - - X X
    Dynamic contrast X X - -
    Talk back compatible X X X X
    D pad navigation X X N/A N/A
  • 3.Installation
  • Installing Red Panic Button on your Android powered device
    admin04-07-2017

    The installation of this application is done through the Google Play Store. The application can be installed by opening the above link using your PC or Android powered device. Accessing the link from an Android powered device will open the Google Play Store application.

    https://play.google.com/store/apps/details?id=uk.ucsoftware.panicbuttonpro

    After pressing the INSTALL button the next step is to Accept all the permissions that the application is requesting by pressing the ACCEPT button. Depending on your Internet connection the application should now download and install in a couple of seconds. A notification should appear when the application is downloaded and installed.

    Now the Red Panic Button should appear in your phone application list. You can add the Red Panic Button application and the Red Panic Button Widgets on your Android Home screen.

  • Installing Red Panic Button on your iOS powered device
    admin04-07-2017

    The installation of this application is done through the App Store. The application can be installed by opening the following link using your PC or iOS powered device:

    http://itunes.apple.com/us/app/red-panic-button/id422029296

    Accessing the link from an iOS powered device will open the App Store application. After pressing GET button, depending on your Internet connection, the application should download and install in a couple of seconds.

  • 4.User Interface Essentials
  • Android User Interface
    admin04-07-2017

  • iOS User Interface
    admin04-07-2017

  • 5.Setting up & Initializing Red Panic Button
  • Setting up on Android
    admin04-07-2017

    The 1st step when starting up for the first time Red Panic Button is to make sure that the Location service is ON. This ensures that the accuracy will be good enough to get the exact location of the person in trouble. If the status is OFF then Location services must be activated and the application will ask you if you want to enable this.

    The 2nd step is to create your create your Panic Information Profile by entering your first and last name. This will ensure that all your friends that receive your panic message by email know who you are. You can change this information at any time by opening the side menu and tapping the Profile.

    The 3rd step is to add at least one panic contact. This is a list of phone numbers or email addresses, usually close friends, who will receive the panic message when the Red Panic Button is pressed.

    The Contacts screen can be accessed by pressing the panic contact label that is located on the Main screen or by tapping the Contacts option from the side menu. Pressing on “+” button will display a dialog where the desired phone number or email address can be added from your Contacts or manually. To delete a number from the list tap and hold it.

    Any customization to your Red Panic Button application can be done by going to the Settings screen that can be accessed from the side menu. There are a lot of features that can be enabled from there, like the emergency number and Panic Email custom messages.

    The 4th step is to connect your social networks to Red Panic Button (Optional).

    This will allow sending the panic messages to all your friends from social networks like Twitter. This feature can be enabled or disabled at any time by pressing going to the Social screen and tapping the Social Network logo.­

  • Setting up on iOS
    admin04-07-2017

    The 1st step when starting up for the first time Red Panic Button is to allow access to Location Services (GPS). There will be a dialog box that requests this feature witch must be approved.

    The 2nd step is to create your create your Panic Information Profile by entering your first and last name. This will ensure that all your friends that receive your panic message by email know who you are. You can change this information at any time by opening the side menu and tapping the Profile.

    The 3rd step is to add at least one panic contact. This is a list of phone numbers or email addresses, usually close friends, who will receive the panic message when the Red Panic Button is pressed.

    The Contacts screen can be accessed by pressing the panic contact label that is located on the Main screen or by tapping the Contacts option from the side menu.

    Pressing on “+” button will display a dialog where the desired phone number or email address can be added from your Contacts or manually. To delete a number from the list press edit from the top right corner.

    Any customization to your Red Panic Button application can be done by going to the Settings screen that can be accessed from the side menu. There are a lot of features that can be enabled from there, like the emergency number and Panic Email custom messages.

    The 4th step is to connect your social networks to Red Panic Button (Optional).
    This will allow sending the panic messages to all your friends from social networks like Twitter. This feature can be enabled or disabled at any time by pressing going to the Social screen and tapping the Social Network logo.
    Here you can also customize the messages that are posted on the Social Networks.

  • Initializing an alert
    admin04-07-2017

    After you have finished the setup or Red Panic Button you can start using it. There are multiple ways to initialize and alert.

    From the Red Panic Button application
    If your device is unlocked open Red Panic Button and just push the Red Panic Button!

    If however your device is locked:

    1. Unlock the device.
    2. Tap on the Red Panic Button icon.
    3. Wait for the location to be displayed (usually instantly).
    4. (Optionally) Wait for the address to be displayed.
    5. Push the Red Panic Button.

    Android Widget
    On Android you can also initialize an alert from the Red Panic Button widgets. Just add the desired Red Panic Widget on your home screen and use those to enable one touch panic alerts. There are 3 widgets available: Panic Button small, Panic Button large and Panic Button media.

    iOS Widget
    On iOS, installing the application will also include it's widgets that are located in Today view. If Red Panic Button widgets does not appear in Today view, press Edit button and select Red Panic Button from the list.

  • 6.Use of Features
  • SMS Panic Message
    admin04-07-2017

    At the press of the Red Panic Button the phone sends the current position in the form of a Google Maps link and the current address, to all the numbers found in the panic contact list. You can customized the message for the SMS by accessing the SMS section of the Settings screen.


    Android

    IOS

  • Email Panic
    admin04-07-2017

    This is the same as the SMS Panic Message. The email contains more information such as the local time when the location was taken acquired and the accuracy of the location. You can customize the Email message and Email subject by accessing the Email section of the Settings screen.


    Android

    IOS

  • Twitter Panic
    admin04-07-2017

    Android

    After the user has authorized Red Panic Button to user his/her Twitter account, at the push of the Red Panic Button a tweet will be posted to the user’s timeline, including the current location in the form of a Google Maps link (bit.ly shortened link).

    The authorization can be done by pressing the Twitter logo from the Social screen. After the Enable Panic Tweet button is pressed a new window will open asking the user to “Authorize Red Panic Button to use your account”. The user has the option to Authorize app or to Cancel the authorization.

    When the user authorizes Red Panic Button to use the account the Twitter Panic is automatically enabled in the application. To disable this feature the user can press the Twitter button from the Social screen again to disable the use of this feature.

    iOS

    After the user has authorized Red Panic Button to user his/her Twitter account, at the push of the Red Panic Button a tweet will be posted to the user’s timeline, including the current location in the form of a Google Maps link (bit.ly shortened link).

    The authorization can be done by pressing the Login switch from the Twitter section on the Social screen. After the Twitter Login switch is pressed a new internet browser window will open asking the user to “Authorize Red Panic Button to use your account”. The user has the option to Authorize app or to Cancel the authorization.

    When the user authorizes Red Panic Button to use the account the Twitter Panic is automatically enabled in the application. To disable this feature the user can use Twitter Login switch from the Twitter section on Social screen to disable the use of this feature.

  • Address in message
    admin04-07-2017

    In order to help users who receive the panic messages sent from our application, we include the user’s address based on the latest acquired location. Please note that this feature will work only if an internet connection is available.

    In the Android and iOS Free version the current location address is not included in the panic messages. The Paid Android and iOS version include this feature.

  • Emergency Dial
    admin04-07-2017

    At the push of the Red Panic Button if Emergency Dial is enabled the phone dials the emergency number, while at the same time sending the panic messages via SMS, Email and Twitter (if enabled).

    The emergency number can be customized and this feature can be enabled or disabled from the Emergency section of the Settings screen.


    Android Emergency Settings

    IOS Emergency Settings

  • Audio Panic email
    admin04-07-2017

    With this feature the device records an audio for 10 seconds and attaches it to the panic email message. To launch this the user needs to press the microphone button from the bottom of the Main screen. This feature can also be accessed from the widget.

    • Tip: You must have at least one email contact in order to be able to use this feature;
    • Tip: On iOS you must allow application access to microphone;
    • Tip: If you want to send the audio file at any time press the Send button from the bottom of the view.


    Android

    IOS

  • Photo Panic email
    admin04-07-2017

    With this feature the application takes a photo using the selected camera and attaches it to the panic email message. To launch this the user needs to press the camera button from the bottom of the Main screen. This feature can also be accessed from the widget.

    • Tip: You must have at least one email contact in order to be able to use this feature;
    • Tip: On iOS you must allow application access to camera;
    • Tip: If you want to send the picture any time sooner press the Send button from the bottom of the view.

    Tip: You can select the camera to be used from the General section of the Settings screen.


    Photo Panic screen

    Android General Settings

    iOS General Settings

  • Video Panic email
    admin04-07-2017

    With this feature the application takes a 5 seconds video using the selected camera and attaches it to the panic email message. To launch this the user needs to press the video   button from the bottom of the Main screen. This feature can also be accessed from the widget.

    • Tip: You must have at least one email contact in order to be able to use this feature;
    • Tip: On iOS you must allow application access to camera;
    • Tip: If you want to send the video any time sooner press the Send button from the bottom of the view.

    Tip: You can select the camera to be used from the General section of the Settings screen.


    Video Panic screen

    Android General Settings

    iOS General Settings

  • Quick SMS
    admin04-07-2017

    If quick SMS is enabled and the application could not get the current location, after 30 seconds it sends a quick SMS containing a customizable panic message.

    This feature can be enabled or disabled at any time from the SMS section of the Settings screen.


    Android Quick SMS

    iOS Quick SMS

  • Remote access (Android only)
    admin04-07-2017

    Any user that receives a Panic SMS message can get the latest position of the device that sent the message. All the user has to do is to reply at the SMS message with “#!panic”.

    This command can be customized, if changed the new reply SMS should look like this: “#!new_custom_command”.

    This feature can be enabled or disabled from the SMS section of the Settings screen.


    Android Remote SMS

  • Multiple contacts
    admin04-07-2017

    The Android and iOS free version is limited to only one panic contact.

    The Paid Android and iOS version have an unlimited number of contacts.

  • Widgets
    admin04-07-2017

    Red Panic Button comes built in with Android Widgets and iOS Today widgets. These enable quick access to Red Panic Button functions (OneTouch Panic alerts).

    The difference between widgets and the application shortcut is the number of steps needed to send the panic message.

    If the shortcut is pressed, you will be presented with the Red Panic Button interface where you have to press the red panic button to initialize an alert.

    If the widget is pressed, panic button enters in OneTouch mode and sends the configured panic alerts automatically. Multiple sized widgets are available

    Android
    Red Panic Button for Android comes with 3 Android Widgets built in. A Large widget Button, a small widget and a media widget (support for photo, audio and video alerts);

    iOS
    Red Panic Button for iOS comes with Today Widgets built in. You'll also find widgets for Photo Alert, Audio alert and Video alert. Widgets are part of Today view.


    Android Widgets

    iOS Widgets

  • International prefix (iOS only)
    admin04-07-2017

    In order to use the Panic SMS feature when the user is in roaming, the phone numbers added to the Panic Contacts list must be properly formatted with the international prefix.

    The user has to choose the country of provenience for each number that is not properly formatted and the app does the rest.
     

  • Dynamic ambient contrast
    admin05-07-2017

    This feature makes use of the phone ambient light sensor to enhance application readability.

    If this feature is enabled it will automatically switch to the appropriate screen settings. These settings refer to background application color and on screen text.

    This feature can be disabled or enabled from the General section of the Settings screen. By default this is enabled.

    This feature is found only in the Android version of Red Panic Button.


    Android Dark background

    Android Light background

  • Talk Back compatibility
    admin05-07-2017

    Red Panic Button enables an accessibility service that speaks as you move around the screen. One such service is TalkBack, by the Eyes-Free Project. It comes preinstalled on many Android- powered devices, but is also available for free from Google Play store.

    This service requires that you have a text-to-speech engine installed on your phone. You can verify if you have one installed in the Text-to-speech settings menu by selecting Listen to an example. If you do not hear anything spoken, install the required voice data by selecting Install voice data.

    Once text-to-speech is functioning correctly, you can enable TalkBack (or another accessibility service) in the Accessibility settings menu. Enable both Accessibility and TalkBack. As you navigate about the device, you should now hear spoken feedback.

    On iOS- powered devices, the user needs to enable Voice-Over feature, from Accessibility menu, located in device Settings.

    You can now attempt to use our application as a blind user would. As you move around using only the directional controller, make sure that the spoken feedback you hear makes sense and is sufficient to navigate the application without any visual cues.

  • D pad navigation
    admin05-07-2017

    Red Panic Button can be easily run without a touchscreen just by using the built in directional pad. All the components of the screen will properly highlight when they are selected.

  • 7.Enhanced Accessibility
  • Accessibility Features
    admin05-07-2017

    The accessibility aspect of the application was also taken in consideration by implementing features like dynamic contrast, talk-back compatible layouts and vibrating feedback.

    Dynamic contrast was made possible by using the phone's in-built light sensor. This is usually used to calibrate the screen brightness but we went further by completely changing the layout colors of the Red Panic Button application screen dynamically when the ambient light conditions change. In low light conditions the application uses a dark layout, automatically changing to a bright layout when conditions change.

    Many Android users have disabilities that require them to interact with their Android devices in different ways. These include users who have visual, physical or age-related disabilities that prevent them from fully using or seeing a touch screen.

    Android provides an accessibility layer that helps these users navigate their Android-powered devices more easily. Red Panic Button for Android uses the following accessibility services: text- to-speech, haptic feedback, and trackball/d-pad navigation that augment the user experience.

    Making sure the application is accessible and works well with the talk-back function enabled was really easy to implement using Vodafone developer guidelines. All in all, we made our application work better with the use of the physical navigation controls available on select Android handsets.


  • Navigation with a Directional Controller
    admin05-07-2017

    Red Panic Button makes full use of Android devices that come with directional controllers, such as:

    ✓ A clickable trackball that users can move in any direction

    ✓ A clickable d-pad that allows users to navigate in four directions.

    ✓ Arrow keys and an OK button that’s equivalent to clicking a trackball or d-pad.

    All of these directional controllers allow users to navigate the screen without using the touch screen. A directional controller is the primary means of navigation for users with visual or some physical impairment (and also for users without impairments when using devices that don't have a touch screen).

    All UI controls in our application are accessible without using the touch screen and clicking with the center button (or OK button) has the same effect as touching the controls on the touch screen.


    NOTE! All Red Panic Button application screens support Android accessibility layer with Talk Back feature enabled. This means that the application will vocally inform the user about his / her selection.

  • Red Panic Button Follows Android User Interface Best Practices
    admin05-07-2017

    Red Panic Button makes it easier for users to learn how to use the application by developing a user interface that complies with Android's standard interaction patterns, instead of creating our own or using interaction patterns from another platform.

    This consistency is especially important for many disabled users, as they may have less contextual information available to try to understand our application’s interface. Specifically, we use the Options Menu as an alternative to complex touch screen tasks and make sure the BACK button correctly moves the user back one logical step.

  • Making Full Use of Android’s Accessibility Layer
    admin05-07-2017

    Red Panic Button enables an accessibility service that speaks as you move around the screen. One such service is TalkBack, by the Eyes-Free Project. It comes preinstalled on many Android- powered devices, but is also available for free from Google Play store.

    This service requires that you have a text-to-speech engine installed on your phone. You can verify if you have one installed in the Text-to-speech settings menu by selecting Listen to an example. If you do not hear anything spoken, install the required voice data by selecting Install voice data.

    Once text-to-speech is functioning correctly, you can enable TalkBack (or another accessibility service) in the Accessibility settings menu. Enable both Accessibility and TalkBack. As you navigate about the device, you should now hear spoken feedback.

    You can now attempt to use our application as a blind user would. As you move around using only the directional controller, make sure that the spoken feedback you hear makes sense and is sufficient to navigate the application without any visual cues.

  • 8.Application Updates
  • Application Updates
    admin05-07-2017

    To make sure you have the latest version of Red Panic Button on your Android or iOS powered device please check the Google Play store or App Store regularly to check for new updates.

    You also have the option to press notification icon from the top-right of the application’s Main screen. After that a window will appear with information regarding new updates available.

    The Android platform features automatic updates for applications that can be enabled from the Google Play store page of Red Panic Button. This will ensure that when danger strikes there is the latest version of Panic Button installed on the device.

    Also to make sure that we can continue to support the development of Red Panic Button and offer new great features don’t forget to rate or review us on the Google Play store and Apple App Store.

  • 9.Tips & Notes
  • Tips & Notes
    admin05-07-2017
    • All the sections of the application are accessible from the side menu, pressing the menu icon or sliding the screen from left to right;
    • Twitter panic can be enabled and disabled at any time from the Social screen;
    • If using the Emergency dial option the user must accept the Emergency calls disclaimer otherwise this option will not be enabled;
    • After install please configure your application to your desire;
    • Use the available widgets for fast panic alerts as these work as One Touch panic;
    • On Android by pressing “Help” option from the toolbar menu will display help information specific for that screen.
  • 10.Technology behind the Red Panic Button
  • Technology
    admin05-07-2017

    Red Panic Button was designed specifically for the Android platform. Our goal was to offer a solution compatible with most Android devices available on the market. With the rapid advances in the mobile technologies and wanting to offer better and more enhanced solutions and features we decided that the Android platform level 14 target SDK (Android 4.0) was the best choice to cover more than 90% of the users with the release of Red Panic Button version 3.0.60.

    Accessing system services for retrieving Location data and sending text messages or emails are all done only when required and following best practices and design rules.

    With the release of Red Panic Button version 3.0.60 we re-designed the application following the Android Material Design rules and implemented a new and more enhanced navigation flow that will ultimately make the application easier to use.

    By stopping the Location Services when not necessary, the Red Panic Button development team made sure that accessing location services (such as GPS data) will affect battery life as little as possible.

    The application also makes use of the media components of Android, offering users the option to record media message (audio, photo and video) and send it via email as an attachment.

    The panic messages sent with our application contain the location of the person in trouble under the form of a Google maps link with the latest latitude and longitude coordinates. We are also sending the address (if available) resolved from the latitude and longitude.

    In the real word environment users who receive the panic message will first read the location address of the person in danger, then most likely they will reply or place a call and only at the end the link will usually be accessed.

    Using Google's geocoding services ensures that the users always get the correct address based on their location. This is a crucial piece of information when sending a panic message. Automatic dial of emergency numbers is also supported.

  • Connecting to social networks
    admin05-07-2017

    Offering an application connected to social networks is a necessity in today's world. Red Panic Button offers users the possibility to connect their Twitter accounts to be able to alert as many people as possible when they are in danger.

  • 11.Appendices
  • Glossary & Acronyms
    admin05-07-2017

    App = Application
    D pad = Directional pad
    EWVAS = Early Warning & Vulnerability Alert System
    RPB = Red Panic Button
    iOS = Apple’s mobile operating system
    GPS = Global Positioning System
    SDK = Software Development Kit

  • Customer Support
    admin05-07-2017

    For any issues or inconveniences we can be contacted at the following email address: info@redpanicbutton.com

  • Feedback
    admin05-07-2017

    With more than 105.000 installations on Android and more than 35.000 installations on iOS, Red Panic Button passed through an intense refinement process with feedback help from users.

    On both Android and iOS there is a built in features to send feedback to the developers. Just press Send Feedback icon available on the Info screen and leave us a comment if you found a bug, want to request a feature or just like to send us a couple of words.

  • Copyright & Legal
    admin05-07-2017

    The information contained in this document is the exclusive property of Ultimate Communication Software LTD and its licensor(s).

    This work is protected under E.U. copyright law and the copyright laws of the given countries of origin and applicable international laws, treaties, and/or conventions. No part of this work may be reproduced or transmitted in any form or by any means, electronic or mechanical, including photocopying or recording, or by any information storage or retrieval system, except as expressly permitted in writing by Ultimate Communication Software LTD.

    All requests should be sent to Attention: info@redpanicbutton.com

    The information contained in this document is subject to change without notice.

    Android, Google Play store, Google, Apple, iPhone, iPad, iPod, iOS are trademarks, registered trademarks, or service marks in the United States, the European Community, or certain other jurisdictions.

    Other companies and products mentioned herein are trademarks or registered trademarks of their respective trademark owners.

    Copyright © 2017 Communication Software LTD All Rights Reserved